To install HID headlights, follow the steps in instructional videos or installation guides for a straightforward process. HID headlights offer improved brightness and a clean look, making them a popular upgrade, even for beginners.
The installation typically involves no major modifications and can be easily accomplished with the right kit. Aftermarket HID conversion kits are available for almost any vehicle, allowing for a relatively simple installation process. It’s important to note that HID bulbs require ballasts for proper function, so ensure that your HID conversion kit includes all necessary components.
With the right resources and equipment, installing HID headlights can be a rewarding and beneficial upgrade for your vehicle.
Introduction To Hid Headlights
When it comes to upgrading your vehicle’s headlights, HID (High-Intensity Discharge) headlights are a popular choice over traditional halogen headlights. The benefits of HID over halogen are numerous. HID headlights are much brighter, longer-lasting, and energy-efficient compared to halogen headlights. Moreover, they provide better visibility, making seeing the road and other obstacles easier.
However, before installing HID headlights, you need to keep some safety and legal considerations in mind. Make sure that the HID kit you’re installing is legal in your state or country. Some states have regulations regarding the colour temperature and brightness of headlights. It’s important to check these regulations before installing the HID headlights.
Additionally, it’s important to install the HID kit properly with the right wiring harness and ballasts. You can find plenty of resources online, such as videos and tutorials, that provide step-by-step guidance on how to install HID headlights. Follow them carefully to ensure a safe and successful installation.
Assessing Compatibility
When it comes to installing HID headlights, assessing compatibility with your vehicle is crucial. You must consider the vehicle specifics and choose the right HID kit for a successful installation.
Installing HID headlights is relatively easy and doesn’t require heavy modification. With the right HID conversion kit, you can upgrade your headlights’ output, making them much brighter and giving your car a clean, crisp look.
The HID bulbs can be installed directly into the existing headlight socket without the need for any modifications to the vehicle’s wiring or headlight housing. They will lock right into your housing and connect directly to your vehicle’s power harness, making the installation process very easy.
However, it’s important to note that not all HID conversion kits are created equal. It is essential to buy a kit that includes HID bulbs, ballasts, mounting elements, wiring, and other necessary components for a proper installation.
Gathering The Tools And Materials
To install HID headlights, you will need the following tools:
| 1. Screwdriver |
| 2. Pliers |
| 3. Wire cutters |
| 4. Electrical tape |
| 5. HID conversion kit |
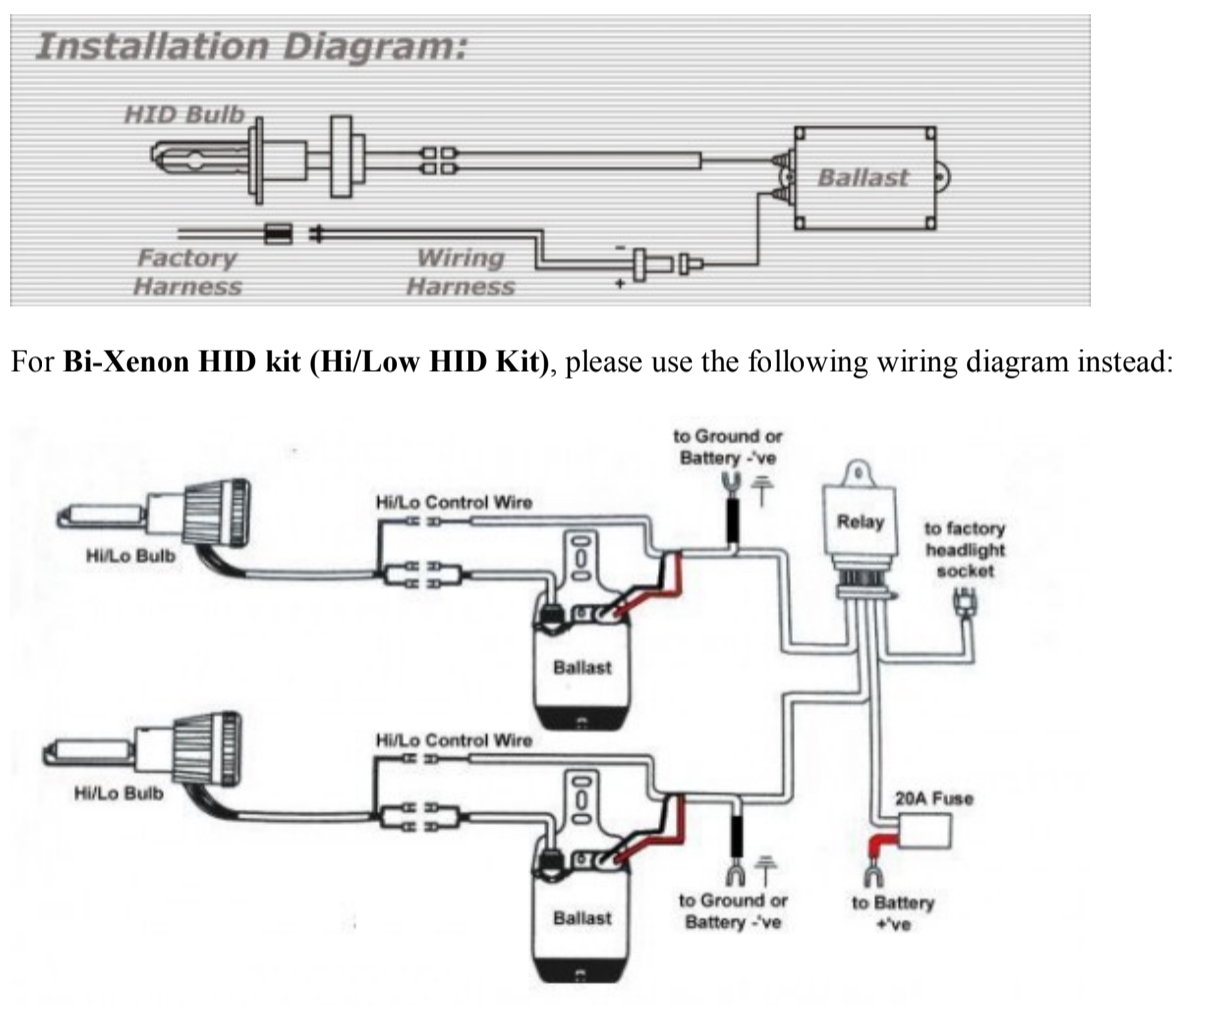
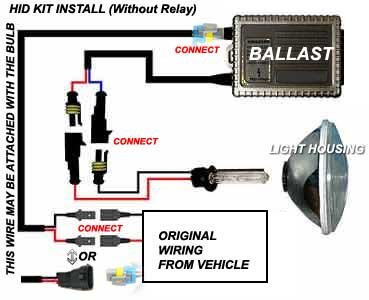
Before you begin the installation process, it’s important to understand the components of the HID kit. The kit usually includes HID bulbs, ballasts, mounting elements, and wiring. The bulbs are responsible for producing the light, while the ballasts provide the necessary power. Mounting elements are used to secure the components in place, and wiring is used to connect the system to your vehicle’s power harness.
Once you have gathered all the required tools and materials, you can proceed with the installation process.

Credit: garage.redline360.com
Pre-installation Steps
When it comes to installing HID headlights, there are a few pre-installation steps you should follow. This includes understanding the wiring harness, locating the relay, connecting the ground wire, mounting the ballast, and installing the HID bulbs. By following these steps, you can easily upgrade your headlights for a brighter and cleaner look.
| Pre-Installation Steps |
|---|
|
Removing The Stock Bulbs
To install HID headlights, start by removing the stock bulbs from your vehicle’s headlight housing. This can usually be done without any modifications to the wiring or housing, making the installation process easy for beginners. Once the stock bulbs are removed, you can proceed with installing the HID conversion kit for brighter and crisper headlights.
To install HID headlights, it’s important to first remove the stock bulbs. This involves opening the headlight assembly and handling the OEM bulbs carefully. Several tutorials are available online that provide step-by-step instructions for installing HID headlights. These tutorials explain how to install an HID kit, wiring the HID kit, removing the OEM bulb, mounting the ballast, and installing the relay harness. It’s important to follow the instructions carefully and use a high-quality conversion kit that includes HID bulbs, ballasts, mounting elements, and wiring. With the right kit, installing HID headlights can be a great upgrade, even for beginners, as it provides much brighter output and a clean, crisp look without the need for heavy modification. However, it’s important to note that not all HID conversion kits are created equal, so it’s important to do your research before making a purchase.

Credit: m.youtube.com
Installing The Hid Bulbs
Installing HID bulbs can be a bit tricky, but with the right tools and instructions, it can be done easily. First, you need to remove the old bulbs and install the new ones. Then, you need to connect the wiring harness and mount the ballast.
Finally, you can test the new headlights to make sure they are working properly. With a little patience and attention to detail, anyone can install HID headlights.
Installing HID headlights is a straightforward process. Begin by removing the existing bulbs and securing the new HID bulbs in place. Ensure proper alignment for optimal performance. HID kits come with all necessary components for easy installation. You can upgrade to HID without complex modifications. The bulbs fit directly into the headlight socket, connecting to the vehicle’s power harness. Aftermarket conversion kits make it simple to enjoy the benefits of HID lighting. Remember, HID bulbs require ballasts for operation. Choose a reliable kit that includes all essential components for a successful installation.
Wiring And Ballast Installation
To install HID headlights, start by routing the wires and connecting the ground wire. Then, mount the ballast and install the HID bulbs with anti-glare shield. Ensure proper wiring and relay harness installation for a brighter, crisper look without heavy modification.
For easy installation, use an HID conversion kit with bulbs, ballasts, and wiring.
Installing HID headlights involves wiring the ballast and connecting the wiring harness. Mounting the ballast is an important step in the installation process. When mounting the ballast, ensure it is securely positioned to avoid any movement. Connecting the wiring harness correctly is crucial for the HID headlights to function properly. Make sure to follow the manufacturer’s instructions when connecting the wiring harness to the ballast and the vehicle’s electrical system. Proper routing of the wires is essential to prevent any damage and ensure a clean installation. Ground wire connection should be done securely to guarantee a stable electrical connection. Additionally, following the installation tips provided by experts can help in achieving optimal results.
Finalizing The Installation
After completing the wiring and mounting the ballast, the next step in installing HID headlights is finalizing the installation by connecting the ground wire and installing the HID bulbs. This easy process does not require heavy modification and is suitable for beginners.
| Installing HID headlights provides brighter output and a clean look. |
| No heavy modifications are required, making it suitable for beginners. |
| HID bulbs can be installed directly into existing headlight sockets. |
| They connect easily to the vehicle’s power harness for a simple installation process. |
| Aftermarket HID conversion kits are available for almost any vehicle model. |
| Proper kits include bulbs, ballasts, wiring, and mounting elements for functionality. |
Troubleshooting Common Issues
|
When troubleshooting common issues with HID headlights, it’s important to address flickering lights. Check the connections and ensure they are secure to prevent any flickering. If you encounter bulb out errors, confirm that the bulbs are properly seated in the sockets. Replacing any faulty bulbs can resolve this issue. |
Maintenance And Care
When it comes to maintenance and care of your HID headlights, there are a few things you should keep in mind. Regular checkups are important to ensure that your headlights are working properly and are not in need of any repairs. Cleaning your HID headlights is also essential to keep them looking their best and to maintain their brightness. Make sure to use a soft cloth and a gentle cleaning solution to avoid scratching the surface of the headlights. Additionally, when installing HID headlights, it is important to follow the instructions carefully and use the proper wiring and mounting elements to ensure a safe and effective installation.
Upgrading Further
When it comes to upgrading further and making advanced modifications to your HID headlights, there are a few options to consider. Adding accessories to enhance the functionality and appearance of your headlights is a popular choice. Some standard accessories include anti-glare shields, relay wiring harnesses, and control units. These accessories can improve the performance and reliability of your HID headlights.
Additionally, you can explore various installation methods by watching tutorial videos on platforms like YouTube. Experts provide step-by-step guidance on how to install HID headlights, including wiring the HID kit, mounting the ballast, and drilling headlight holes if needed. The installation process is relatively easy and does not require heavy modification.
It is important to note that HID bulbs can be installed directly into the existing headlight socket without any modifications to the vehicle’s wiring or headlight housing. This makes the installation process even easier for beginners.

Credit: m.youtube.com
Frequently Asked Questions
Are Hid Headlights Easy To Install?
Yes, HID headlights are easy to install, requiring no heavy modifications and suitable even for beginners. With the right kit, you can easily install HID bulbs on your own. The installation process is straightforward, with the bulbs locking into the housing and connecting directly to the power harness.
Can I Install Hid Bulbs To The Stock Headlights?
Yes, HID bulbs can be installed directly into the existing headlight socket without modifying the vehicle’s wiring or headlight housing. The installation process is straightforward, making it a great upgrade even for beginners. Aftermarket HID conversion kits can be used to install HID bulbs on almost any vehicle.
Can I Just Put Hid Bulbs In My Car?
Yes, aftermarket HID conversion kits can be used to install HID bulbs in your car. With the right kit, it’s a relatively easy process.
Can You Install Hid Without Ballast?
No, HID bulbs cannot be installed without a ballast. The ballast is essential for the bulbs to function properly. It’s important to use a HID conversion kit that includes bulbs, ballasts, and all necessary components for proper installation.
Are Hid Headlights Easy To Install?
Yes, with a HID Conversion Kit, the process is straightforward and suitable for beginners. It offers brighter output without heavy modification.
Can I Install Hid Bulbs To The Stock Headlights?
HID bulbs can be installed directly into the existing headlight socket without modifying the vehicle’s wiring or headlight housing.
Can I Put Led Or Hid Bulbs In My Stock Headlights?
Aftermarket HID conversion kits can be used to install HID bulbs on almost any vehicle. It’s essential to choose the right kit for a proper installation.
Conclusion
Installing HID headlights is a great upgrade for beginners. With a clean, crisp look and much brighter output, the process is relatively easy. Aftermarket HID conversion kits can be used on almost any vehicle, making it a convenient and effective option for enhancing your vehicle’s lighting.


Leave a Reply